C++Unicode 和 UTF-8 的转换

代码摘抄于 Stack Overflow

连接:https://stackoverflow.com/questions/12015571/how-to-print-unicode-character-in-c

我一开始的需求是需要在控制台打印进度,用连续的实心正方形来模拟进度,所以就想打印正方形(2588),所以就找到了这个帖子,顺便附上打印实心正方形的代码:

std::cout << "\u2588" << std::endl;

以下是一些转换代码:


#include <iostream>

using namespace std;


int utf8_to_unicode(string utf8_code);
string unicode_to_utf8(int unicode);


int main() {
    cout << unicode_to_utf8(36) << '\t';
    cout << unicode_to_utf8(162) << '\t';
    cout << unicode_to_utf8(8364) << '\t';
    cout << unicode_to_utf8(128578) << endl;

    cout << unicode_to_utf8(0x24) << '\t';
    cout << unicode_to_utf8(0xa2) << '\t';
    cout << unicode_to_utf8(0x20ac) << '\t';
    cout << unicode_to_utf8(0x1f642) << endl;

    cout << utf8_to_unicode("$") << '\t';
    cout << utf8_to_unicode("¢") << '\t';
    cout << utf8_to_unicode("€") << '\t';
    cout << utf8_to_unicode("?") << endl;

    cout << utf8_to_unicode("\x24") << '\t';
    cout << utf8_to_unicode("\xc2\xa2") << '\t';
    cout << utf8_to_unicode("\xe2\x82\xac") << '\t';
    cout << utf8_to_unicode("\xf0\x9f\x99\x82") << endl;

    return 0;
}

int utf8_to_unicode(string utf8_code) {
    unsigned utf8_size = utf8_code.length();
    int unicode = 0;

    for (unsigned p = 0; p < utf8_size; ++p) {
        int bit_count = (p ? 6 : 8 - utf8_size - (utf8_size == 1 ? 0 : 1)),
            shift = (p < utf8_size - 1 ? (6 * (utf8_size - p - 1)) : 0);

        for (int k = 0; k < bit_count; ++k)
            unicode += ((utf8_code[p] & (1 << k)) << shift);
    }

    return unicode;
}

string unicode_to_utf8(int unicode) {
    string s;

    if (unicode >= 0 and unicode <= 0x7f) { // 7F(16) = 127(10)
        s = static_cast<char>(unicode);

        return s;
    } else if (unicode <= 0x7ff) { // 7FF(16) = 2047(10)
        unsigned char c1 = 192, c2 = 128;

        for (int k = 0; k < 11; ++k) {
            if (k < 6)  c2 |= (unicode % 64) & (1 << k);
            else c1 |= (unicode >> 6) & (1 << (k - 6));
        }

        s = c1;    s += c2;

        return s;
    } else if (unicode <= 0xffff) { // FFFF(16) = 65535(10)
        unsigned char c1 = 224, c2 = 128, c3 = 128;

        for (int k = 0; k < 16; ++k) {
            if (k < 6)  c3 |= (unicode % 64) & (1 << k);
            else if (k < 12) c2 |= (unicode >> 6) & (1 << (k - 6));
            else c1 |= (unicode >> 12) & (1 << (k - 12));
        }

        s = c1;    s += c2;    s += c3;

        return s;
    } else if (unicode <= 0x1fffff) { // 1FFFFF(16) = 2097151(10)
        unsigned char c1 = 240, c2 = 128, c3 = 128, c4 = 128;

        for (int k = 0; k < 21; ++k) {
            if (k < 6)  c4 |= (unicode % 64) & (1 << k);
            else if (k < 12) c3 |= (unicode >> 6) & (1 << (k - 6));
            else if (k < 18) c2 |= (unicode >> 12) & (1 << (k - 12));
            else c1 |= (unicode >> 18) & (1 << (k - 18));
        }

        s = c1;    s += c2;    s += c3;    s += c4;

        return s;
    } else if (unicode <= 0x3ffffff) { // 3FFFFFF(16) = 67108863(10)
        ;  // actually, there are no 5-bytes unicodes
    } else if (unicode <= 0x7fffffff) { // 7FFFFFFF(16) = 2147483647(10)
        ;  // actually, there are no 6-bytes unicodes
    } else  ; // incorrect unicode (< 0 or > 2147483647)

    return "";
}
C++字符数字的编码(Encode)与解码(Decode)

在日常应用中,我们常用结构体或者类来存储一条信息,这种方式很方便,但是不利于数据的传输。例如在网络编程中,我们需要将结构中的数据转化为字节流才能进行传输,我们可以利用memcpy强行将结构化的数据转化为字符串,在接收方以同样的方式转化为来。此法简单易用,但是由于结构化的数据涉及到字符对齐的问题,这种方法会造成额外的数据开销,所以我们最好自己手动对结构化的数据进行编码,当然这种方法也有弊端,虽然在一定程度上节省了传输流量,但结构中的字段很多时,代码量会增大,最好编写工具自动生成一些代码。

#include <iostream>
 #include <memory.h>
 #include <string.h>
 using namespace std;
 
 #define ENCODE(buf, size, offset, data)\
     if ((NULL == buf) || ( == size))\
     {\
     return -;\
     }\
     if (offset + sizeof(data) > size)\
     {\
     return -;\
     }\
     {\
     uint8_t *p = (uint8_t*)buf;\
     p=p+offset; \
     memcpy(p,&data,sizeof(data)); \
     offset = offset + sizeof(data); \
     }
 
 #define DECODE(buf, size, offset, data)\
     if ((NULL == buf) || ( == size))\
     {\
     return -;\
     }\
     if (offset + sizeof(data) > size)\
     {\
     return -;\
     }\
     {\
     uint8_t *p = (uint8_t*)buf;\
     p=p+offset; \
     memcpy(&data,p,sizeof(data)); \
     offset = offset + sizeof(data); \
     }
 
 #define ENCODE_STR(buf, size, offset, data, length)\
     if ((NULL == buf) || ( == size) || ( >= length) )\
     {\
     return -;\
     }\
     if (offset + length > size)\
     {\
     return -;\
     }\
     {\
     uint8_t *p = (uint8_t*)buf;\
     p=p+offset; \
     memcpy(p,data,length); \
     offset = offset+ length; \
     }
 
 #define DECODE_STR(buf, size, offset, data, length)\
     if ((NULL == buf) || ( == size) || ( >= length) )\
     {\
     return -;\
     }\
     if (offset + length > size)\
     {\
     return -;\
     }\
     {\
     uint8_t *p = (uint8_t*)buf;\
     p=p+offset; \
     memcpy(data,p,length); \
     offset = offset+ length; \
     }
 
 enum{
     enmMaxMsgLength = ,
     enmMaxNameLength =
 };
 
 class Msg{
     int iAge;
     char szName[enmMaxNameLength];
     double dScore;
 public:
     Msg()
     {
 
     }
     Msg(int age,const char* name,double score):iAge(age),dScore(score)
     {
         strcpy(szName,name);
     }
     virtual ~Msg(){}
     virtual int encode(char *buf)
     {
         size_t offset = ;
         memset(buf,'',enmMaxMsgLength);
         ENCODE(buf,enmMaxMsgLength,offset,iAge);
         ENCODE_STR(buf,enmMaxMsgLength,offset,szName,enmMaxNameLength);
         ENCODE(buf,enmMaxMsgLength,offset,dScore);
         return offset;
     };
     virtual int decode(char *buf,size_t bufSize)
     {
         size_t offset = ;
         DECODE(buf,bufSize,offset,iAge);
         DECODE_STR(buf,bufSize,offset,szName,enmMaxNameLength);
         DECODE(buf,bufSize,offset,dScore);
         return offset;
     }
     void display()
     {
         cout<<iAge<<" "<<szName<<" "<<dScore<<endl;
     }
 };
 
 int main(int argc, char* argv[])
 {
     size_t offset = ;
     char buf[enmMaxMsgLength],*recv = NULL;
     Msg msg(,"hwllo world",23.69),msg1;
     msg.display();
     offset = msg.encode(buf);
     cout<<offset<<endl;
     cout<<sizeof(Msg)<<endl;
     recv = new char[offset];
     memcpy(recv,buf,offset);
     msg1.decode(recv,offset);
     msg1.display();
     return ;
 }

cannot find -lmysqlclient 的解决方案

在 使用编译命令 -lmysqlclient时,如果提示这个信息。

先确认一下 有没有安装mysql-devel

执行如下命令

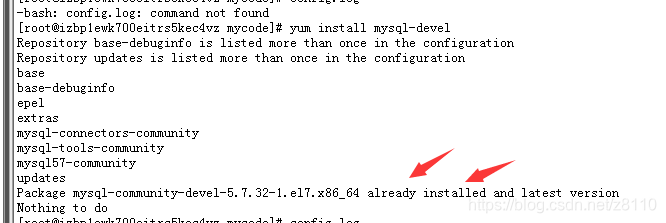
yum install mysql-devel

如果提示

这个信息 说明已经成功安装了mysql-devel

此时执行命令

mysql_config

查看-lmysqlclient这个库 在哪个目录。

如图 ,只需要把之前的编译命令- lmysqlclient替换成 -L/usr/lib64/mysql -lmysqlclient这个就好了,就能编译过了。

意思是 不从默认的文件夹/usr/lib里边取动态库-lmysqlclient从绝对目录里边取。

所以也可以分析出来出现这个 找不到这个库的原因不是 因为linux机器上没有这个库。

而是 找错了 位置,如果嫌加绝对目录太麻烦,直接复制一份到/usr/lib一份就行了。

解决AWS上死机问题

状况:每天手动重启AWS的机器,如果不重启,

网站打不开。

发现死机原因为内存用完了,
这也是我后面安装软件时才发现的

检查内存

free

检查谁用了内存

ps aux|head -1;ps aux|grep -v PID|sort -rn -k +4|head

检查发现使用内存的都是APACHE

设轩限制访问数量

vi /etc/httpd/conf/httpd.conf

webbench -c 500  -t  30   http://www.ingridmillet.com.cn/

树莓派4+ Raspberry Pi OS with desktop and recommended software

1.使用TF卡,下载安装包,
网址:https://www.raspberrypi.com/software/operating-systems/
安装包链接
https://downloads.raspberrypi.org/raspios_full_armhf/images/raspios_full_armhf-2022-04-07/2022-04-04-raspios-bullseye-armhf-full.img.xz

2.把系统安装在TF卡
在windowsw使用win32 disk image即可,也可以使用树莓派自带的软件

3.进入系统,安装常用软件

apt-get install -y vim
apt-get install -y make
apt-get install -y automake
apt-get install -y gcc

#安装wifi管理软件
apt-get install -y iw

#安装USB管理软件
apt-get install -y usbutils 

#安装v4l软件

apt-get install -y v4l-utils 

#安装 NTFS 软件
apt-get install -y ntfs-3g

#unzip
apt-get install -y zip unzip 

apt-get install -y cpio

#准备软件
apt-get install -y gcc 
apt-get install -y gimp
apt-get install -y swig 
apt-get install -y libtool
apt-get install -y nasm 
apt-get install -y autoconf 
apt-get install -y automake 
apt-get install -y git 

apt-get install -y mercurial 

apt-get install -y libcurl3
apt-get install -y cmake
apt-get install -y yasm

#firewall
apt-get install -y ufw

#
apt-get install -y chkconfig

4.安装zlib,由于直接安装失败,我是通过源码安装的

yum -y install zlib -y
wget  http://10.8.0.24:18888/Download/armhf/zlib-1.2.11.tar.gz
tar -zxvf zlib-1.2.11.tar.gz
cd zlib-1.2.11
./configure
make && make install

5.安装pkg-config

cd /opt/pkg 
wget http://pkgconfig.freedesktop.org/releases/pkg-config-0.29.2.tar.gz
tar xvf pkg-config-0.29.2.tar.gz 
cd pkg-config-0.29.2
./configure --prefix=/usr/local/pkg-config --with-internal-glib 
make
make install

6. 树莓派pip更换国内源

pip install pipsource
#查看当前有哪些可靠的源
pipsource list
#查看哪些源我们已经配置为可使用的
pipsource show

输入sudo vim /etc/pip.conf
原来是https://www.piwheels.org/simple/这个库是最全的,有一些库必须用这个下载,国内的全都不行。
在文件最后加一句
extra-index-url=https://mirrors.aliyun.com/pypi/simple/

7.树莓派 apt-get 换清华源

我们需要先修改sources.list文件的配置:
sudo vim /etc/apt/sources.list
注释掉源文件的配置内容,替换成清华源:

deb http://mirrors.tuna.tsinghua.edu.cn/raspbian/raspbian/ stretch main contrib non-free rpi
deb-src http://mirrors.tuna.tsinghua.edu.cn/raspbian/raspbian/ stretch main contrib non-free rpi

然后修改raspi.list文件的配置:
sudo vim /etc/apt/sources.list.d/raspi.list
注释掉源文件的配置内容,替换成清华源:

deb http://mirror.tuna.tsinghua.edu.cn/raspberrypi/ stretch main ui
deb-src http://mirror.tuna.tsinghua.edu.cn/raspberrypi/ stretch main ui

8.

AWS 上服务器centos 重新建源

AWS服务器的CENTOS 提示

rpm -qa |grep yum

rpm -e yum-plugin-fastestmirror-1.1.31-50.el7.noarch –nodeps

rpm -e yum-3.4.3-161.el7.centos.noarch –nodeps

rpm -e yum-metadata-parser-1.1.4-10.el7.x86_64 –nodeps

yum-utils-1.1.31-54.el7_8.noarch

移动除些源

下载新源
cd /var/www/setup

wget https://mirrors.163.com/centos/7.9.2009/os/x86_64/Packages/python-iniparse-0.4-9.el7.noarch.rpm

wget https://mirrors.163.com/centos/7.9.2009/os/x86_64/Packages/python-urlgrabber-3.10-10.el7.noarch.rpm

wget https://mirrors.163.com/centos/7.9.2009/os/x86_64/Packages/yum-3.4.3-168.el7.centos.noarch.rpm
wget https://mirrors.163.com/centos/7.9.2009/os/x86_64/Packages/yum-metadata-parser-1.1.4-10.el7.x86_64.rpm
wget https://mirrors.163.com/centos/7.9.2009/os/x86_64/Packages/yum-plugin-fastestmirror-1.1.31-54.el7_8.noarch.rpm

wget http://mirror.centos.org/centos/7/os/x86_64/Packages/yum-3.4.3-168.el7.centos.noarch.rpm

wget http://mirror.centos.org/centos/7/os/x86_64/Packages/yum-metadata-parser-1.1.4-10.el7.x86_64.rpm

wget http://mirror.centos.org/centos/7/os/x86_64/Packages/yum-plugin-fastestmirror-1.1.31-54.el7_8.noarch.rpm

重新编辑REPO

curl http://mirrors.163.com/.help/CentOS7-Base-163.repo -o /etc/yum.repos.d/CentOS6-Base-163.repo
vim /etc/yum.repo/CentOS7-Base-163.repo

如果网络允许,baseurl可以使用外网地址,并使用全文替换:
:1,$s/$releasever/7
否则,可以本地挂载iso系统光盘

修改yum的代码,vi /bin/yun 第一行python 改成python2

同样修改yum 命令使用到的python

vi /usr/libexec/urlgrabber-ext-down

修改报错文件,将头行”#!/usr/bin/python” 改为 “#!/usr/bin/python2″即可。

重建缓存并使用yum install 来进行测试是否yum源重建成功

清除缓存

[root@localhost yum.repos.d]# yum clean all
重建缓存,以提高搜索安装软件的速度

[root@localhost yum.repos.d]# yum makecache
更新系统(可选)

[root@localhost yum.repos.d]# yum update
测试yum安装:

[root@localhost yum.repos.d]# yum install vsftp